

3D Text and shape Photoshop tutorial | Golden 3D text effect
Howto & Style
Introduction
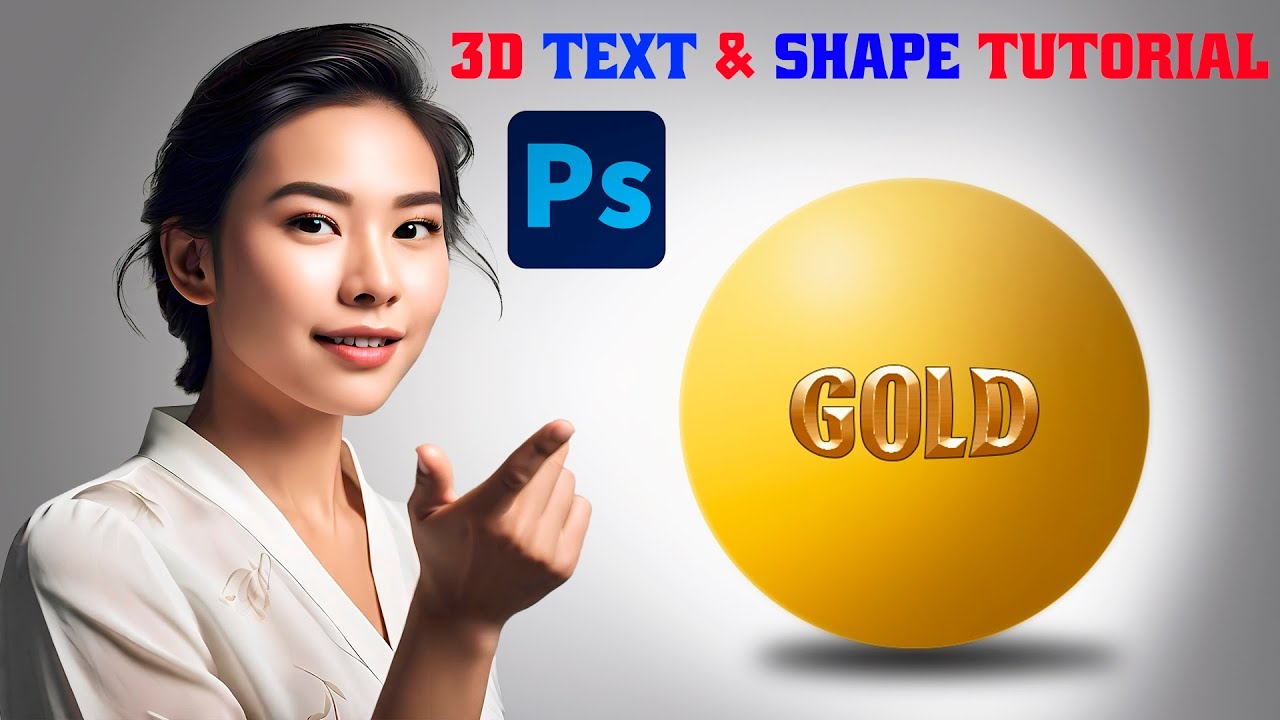
Welcome back! In this tutorial, I will guide you through the process of creating a stunning golden 3D text effect on a 3D ball using Adobe Photoshop. Let’s dive into the step-by-step process.
Step 1: Create a New Canvas
- Open Photoshop and create a new canvas with dimensions 3000 x 2000 pixels. Set the background color to white.
Step 2: Create the Ball
- Create a new layer and use the Ellipse Tool. Hold down the Shift key while drawing to create a perfect circle.
- Fill the circle with a yellow color.
Step 3: Add Light and Shadows
- Create another new layer and name it Dark.
- Change the color to a darker shade of yellow, and use the Brush Tool. While holding Ctrl, click on the ellipse layer to select it.
- Increase the brush size to 31% and paint darkness on one side of the ball.
- Create a new layer named Light. Choose a lighter shade of yellow and add some light to the opposite side.
- Decrease the brush size and select an even lighter color to add shine by dabbing a few times.
Step 4: Soften Edges
- Go back to the ellipse layer, right-click, and select Convert to Smart Filters.
- Navigate to Filter > Blur and apply Gaussian Blur to soften any harsh edges.
Step 5: Creating the Text
- Create another layer for the text and type the word "Gold".
- Press Ctrl + T to transform and center the text.
Step 6: Apply Blending Options
- Right-click the text layer and go to Blending Options.
- Select Gradient Overlay and input the specific color codes that I will provide in the description below.
- First Color Code: #FFD700
- Second Color Code: #FFA500
- Third Color Code: #FFBF00
- Next, enable Bevel & Emboss with the following settings:
- Style: Bevel
- Technique: Chisel Hard
- Depth: 100
- Size: 191
- Soften: 0
- Angle: 90
- Altitude: 30
- Gloss Control: This one
- Highlight Mode: Overlay
- Shadow Mode: Multiply
- Press OK to apply these effects.
Step 7: Create a Shadow for the Text
- Press Ctrl + J to duplicate the text layer, then right-click and convert it to a shape.
- Transform the shape by pressing Ctrl + T and then click on Edit > Transform Path > Warp to give it a slight curvature.
- Create a new layer beneath the ellipse layer and name it Shadow.
- Using the Ellipse Tool, create an ellipse for the shadow and fill it with black.
- Position the shadow appropriately beneath the ball.
Step 8: Soften the Shadow
- Right-click on the shadow layer to create a mask, then use the Brush Tool to dab on the mask layer for subtle fading.
- Convert the shadow layer to smart filters, then apply Gaussian Blur for a softer look. A radius of 6 works well.
And there you have it! Your golden 3D text effect on a golden ball is complete!
If you liked this tutorial, please subscribe to the channel for more creative projects!
Keyword
- 3D text
- Photoshop
- Golden ball
- Gradient overlay
- Bevel and emboss
- Gaussian Blur
FAQ
Q: What version of Photoshop do I need for this tutorial?
A: This tutorial can be done in any version of Adobe Photoshop that supports layers and smart filters.
Q: Can I use different colors for the ball and text?
A: Absolutely! Feel free to experiment with different color schemes to match your project.
Q: What is the benefit of using Smart Filters?
A: Smart Filters allow you to edit or remove filters after they've been applied, maintaining flexibility in your workflow.
Q: How can I get the specific color codes mentioned?
A: You can use any color picker tool to input the HEX values I provided or find similar colors that appeal to you.
Q: Is it necessary to convert the text layer to a shape?
A: Converting the text to a shape allows for more advanced transformations and effects that are not available for regular text layers.