

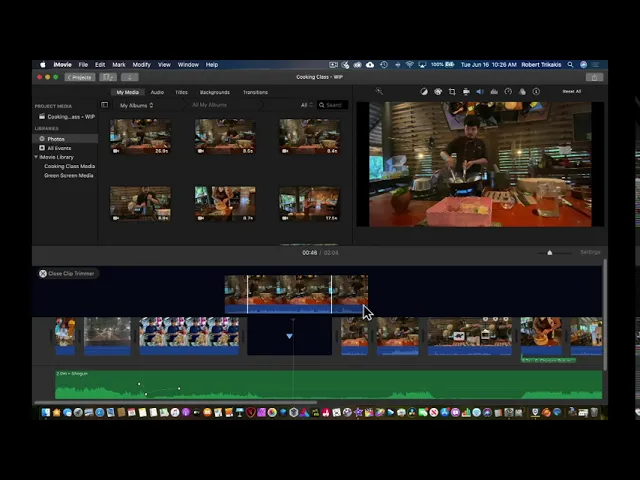
DeskTop Clip Trimmer
Film & Animation
Introduction
Now that you have mastered the basics of trimming media clips in your timeline, it's time to elevate your editing skills to a new level. In this article, we will review how to efficiently trim in your timeline and introduce you to an advanced feature in iMovie for desktop—the Clip Trimmer.
Review of Trimming in the Timeline
To trim a clip in your timeline, you begin by selecting the clip you want to edit. Using your playback head, you can adjust the in point and out point of the clip. By navigating to the modified menu, you have the option to trim the playback head, effectively cutting the clip. While working in the timeline provides ample flexibility for trimming, there's a more refined method available.
Introducing the Clip Trimmer
The Clip Trimmer is a feature added in iMovie for desktop that allows for finer edits and can be found under the Window menu—look for the option that says "Show Clip Trimmer." For a quicker access method, you can also hold the Control key while selecting this option. Once activated, the Clip Trimmer will lift your selected clip onto a new track above your primary storyline.
In the Clip Trimmer, you will find three main areas: the in point and out point for adjustments, complemented by grayed-out areas on both sides that represent additional original footage from your video clip. This additional material provides an opportunity to find the perfect spot for your cuts.
Utilizing the Slip Edit Tool
The new tool that appears in the Clip Trimmer is the Slip Edit Tool. This powerful feature allows you to slide or "slip" the video piece backward and forward within the available footage, without altering your project's timeline length. You can adjust both your in and out points using this tool while retaining the overall duration of your timeline.
This functionality is typically reserved for advanced software like Final Cut Pro X, making it an impressive addition to iMovie.
Making Edits and Closing the Clip Trimmer
While in the Clip Trimmer, you can easily select another clip and apply your edits accordingly. If you decide to leave a clip untouched, you can simply proceed to close the Clip Trimmer by clicking the down arrow button or using the shortcut command on your keyboard. After clicking the 'X,' you'll finish editing and return to your regular timeline view.
The Clip Trimmer, together with the Slip Edit Tool, empowers you to perform precise edits on your clips, enhancing your editing capabilities and refining your projects.
Keywords
- Clip Trimmer
- iMovie
- Timeline
- In Point
- Out Point
- Slip Edit Tool
- Fine Edits
FAQ
Q1: What is the Clip Trimmer in iMovie?
A1: The Clip Trimmer is a feature in iMovie for desktop that allows users to perform finer edits on clips by adjusting the in point and out point while providing access to additional original footage.
Q2: How do I access the Clip Trimmer?
A2: You can access the Clip Trimmer from the Window menu by selecting "Show Clip Trimmer" or by holding down the Control key and selecting the same option.
Q3: What is the Slip Edit Tool?
A3: The Slip Edit Tool allows you to move your video clip backward and forward within the available footage without changing the overall duration of your project timeline.
Q4: Can I edit multiple clips in the Clip Trimmer?
A4: Yes, while in the Clip Trimmer, you can select and edit multiple clips as needed.
Q5: What happens when I close the Clip Trimmer?
A5: When you close the Clip Trimmer by clicking the 'X' or using the down arrow button, you will return to your regular timeline where your edits are applied.