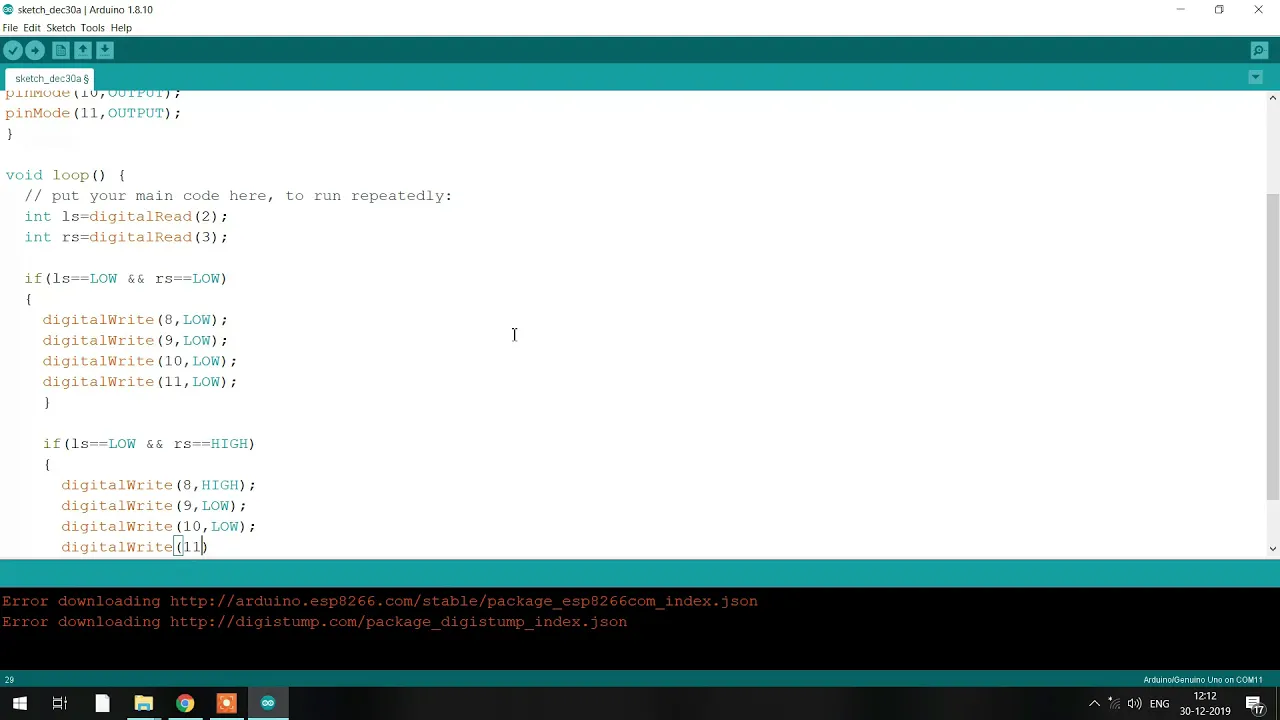
detailed explanation of code for line follower robot and also how to upload the code in arduino uno
People & Blogs

Detailed Explanation of Code for Line Follower Robot and How to Upload the Code in Arduino Uno
In this guide, we'll walk you through the detailed process of uploading a program to your robot using the Arduino IDE software. This article is divided into three main sections: writing the program, uploading it to the Arduino Uno, and a brief summary with keywords and FAQs for quick reference.
Writing the Program
Setting Up the Environment:
Opening the Arduino IDE Software:
- Once you've installed the Arduino IDE software, locate the desktop icon and double-click it.
- The software will take a moment to open, displaying a new window for you to start coding.
Understanding the IDE Layout:
- The window is divided into two main parts:
void setupandvoid loop. void setupis used to configure the pins of the Arduino board.void loopis for writing the code that will run repeatedly.
- The window is divided into two main parts:
Coding the Line Follower Robot:
Configure Pins (Setup):
void setup() (
    pinMode(2, INPUT); // Left Sensor
    pinMode(3, INPUT); // Right Sensor
    pinMode(8, OUTPUT); // Motor Pin
    pinMode(9, OUTPUT); // Motor Pin
    pinMode(10, OUTPUT); // Motor Pin
    pinMode(11, OUTPUT); // Motor Pin
)
Loop to Read and Write Pins (Logic):
void loop() (
    int leftSensor = digitalRead(2);
    int rightSensor = digitalRead(3);

    if (leftSensor == LOW && rightSensor == LOW) {
        // Both sensors on black line
        digitalWrite(8, LOW);
        digitalWrite(9, LOW);
        digitalWrite(10, LOW);
        digitalWrite(11, LOW);
    ) else if (leftSensor == LOW && rightSensor == HIGH) (
        // Left sensor on black, right on white
        digitalWrite(8, HIGH);
        digitalWrite(9, LOW);
        digitalWrite(10, LOW);
        digitalWrite(11, LOW);
    ) else if (leftSensor == HIGH && rightSensor == LOW) (
        // Right sensor on black, left on white
        digitalWrite(8, LOW);
        digitalWrite(9, LOW);
        digitalWrite(10, HIGH);
        digitalWrite(11, LOW);
    ) else if (leftSensor == HIGH && rightSensor == HIGH) (
        // Both sensors on white
        digitalWrite(8, HIGH);
        digitalWrite(9, LOW);
        digitalWrite(10, HIGH);
        digitalWrite(11, LOW);
    )
}
Uploading the Code to Arduino
Connect the Board:
- Connect your Arduino Uno board to your PC or laptop using a USB cable.
Select the Board and Port:
- Go to Tools -> Board and select Arduino Uno.
- Then go to Tools -> Port and select the appropriate port. This option becomes available after connecting the Arduino board.
Save and Compile the Code:
- Save your file with a preferred name.
- Click on the checkmark button to compile the code. The IDE will verify your code for errors.
Upload the Code:
- Click the upload button. The IDE will show the message "Done uploading" once the process is complete successfully.
Finalize:
- Disconnect the Arduino board from the USB cable.
Keywords
Keywords:
- Arduino IDE
- Setup
- Loop
- PinMode
- DigitalRead
- DigitalWrite
- Line Follower Robot
- Input Pins
- Output Pins
- Upload
FAQ
FAQ:
How do I open the Arduino IDE?
- Double-click the Arduino IDE desktop icon to open the software.
What is
void setup?void setupis used to configure the pins on your Arduino board.
What is
void loop?void loopcontains the code that runs repeatedly.
How do I configure Arduino pins?
- Use the
pinModecommand withinvoid setup. For example,pinMode(2, INPUT);configures pin 2 as an input.
- Use the
How do I read sensor values?
- Use the
digitalReadcommand. For example,int leftSensor = digitalRead(2);reads the value from pin 2.
- Use the
How do I upload code to the Arduino Uno?
- After writing and saving the code, select the board and port under the Tools menu, then click the upload button.
By following these detailed steps, you should be able to write, compile, and upload your code to an Arduino Uno board to control a line follower robot.