

PhotoMaker V2 in ComfyUI: Full Guide and Updated Workflow
Film & Animation
Introduction
Introduction
Hey everyone, welcome back to the channel! In today's video, I'm going to talk about PhotoMaker V2 once again, this time inside of ComfyUI. In my last video, I mentioned that the ComfyUI PhotoMaker only supported PhotoMaker V1, but we've had an update and now support for PhotoMaker V2 has been added. Let’s dive into the details.
Update Notice
To start, if you already have the Shimizu ComfyUI PhotoMaker, you can fire up your ComfyUI, go into the manager, click on Custom Nodes Manager, and then, under the filter, change it to 'Install.' Look for PhotoMaker by the author Shimizu with the ID 93. If it's not installed, click 'Install'; if it’s already there, click 'Try Update.'
Additionally, you will need Insight Face. For instructions on how to set this up, refer to my prior videos (linked in the description below).
Setting Up PhotoMaker V2
After the Custom Nodes Manager setup, close it and ensure that your ComfyUI is updated. Start from the default workflow by clicking 'Load Default,' select 'Okay,' and update your checkpoints to an SDXL checkpoint (either the Lightning model or the base model). For this example, I’m using the Lightning SDXL model.
Adjusting Default Settings
Set your empty latent image resolution to something compatible with SDXL, for instance, 768x1344. Then, adjust your K-sampler settings to match the base model you are utilizing.
Loading PhotoMaker V2
- Remove the positive prompt.
- Double-click on a blank space and search for 'PhotoMaker'.
- Choose 'PhotoMaker Loader Plus' from the options.
- Select 'PhotoMaker V2' from the model name dropdown.
If you don't have this model, head to Shimizu’s GitHub repository, find the V2 download link from Hugging Face, then download photomaker_v2.bin.
- Place this file under ComfyUI’s models folder (create a subfolder named
photomaker). - Refresh your ComfyUI and you should now have
photomaker_v2listed.
To continue:
- Double-click on an empty spot and search for 'PhotoMaker Encode Plus'.
- Connect the 'Positive Prompt' conditioning output to the K-sampler.
Conditioning with Insight Face
- Double-click on an empty space, search for 'PhotoMaker', and select 'PhotoMaker Insight Face Loader' and set it to 'CPU'.
- Connect the Loader to the input image.
Cropping and Preparing Your Image
If your reference image is not square or lacks focus on the face, use the 'Prepare Image for Clip Vision' or a 'Crop Image' node to properly frame it. Then, connect your cropped image to the 'PhotoMaker Encode' node.
Adjusting Text Prompts and Styles
You can set the style within PhotoMaker using built-in styles or manually adding text descriptions. Here’s how to do both:
Using Built-in Styles
- Search for 'Apply PhotoMaker Style'.
- Convert the widget input on the text node to input primitive.
- Connect the 'Apply PhotoMaker Style' node as needed for more complex conditioning.
Results and Observations
High step counts and appropriate CFG settings often deliver the best AI-generated results. Ensure that you are using SDXL models as PhotoMaker V2 isn’t compatible with SD 1.5 or 2.1.
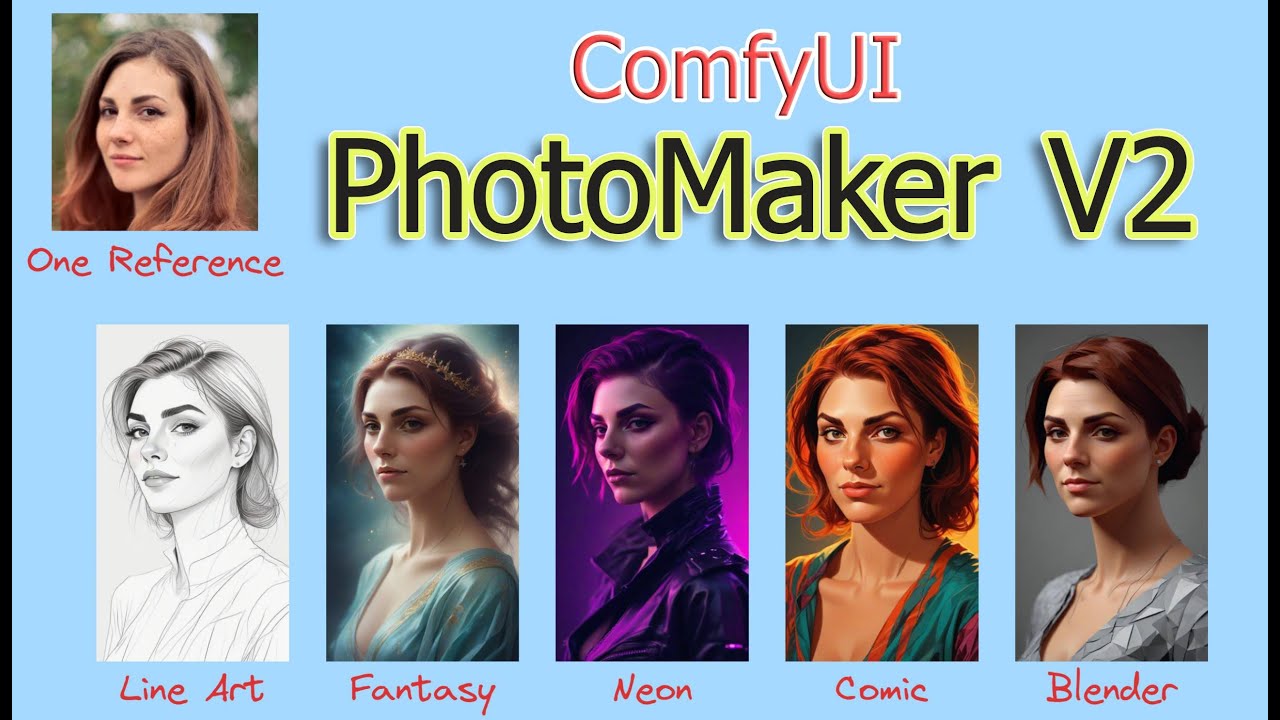
Examples
I showcased several generation results, noting how well PhotoMaker V2 retains the original reference’s orientation. This suggests an improvement over V1 in maintaining image consistency and conditioning.
Conclusion
PhotoMaker V2 in ComfyUI provides enhanced capabilities over V1, especially with high customization of styles and better image conditioning. Remember to follow the steps carefully to get optimal results.
Have you noticed the image orientation consistency with PhotoMaker V2? Share your experiences in the comments! If you liked this guide, click the like button, subscribe, and I’ll see you in the next video!
Keywords
- PhotoMaker V2
- SDXL checkpoint
- ComfyUI
- Insight Face
- Custom nodes manager
- Positive prompt
- PhotoMaker Loader Plus
- K-sampler settings
- Built-in styles
- Image cropping
- Conditioning
FAQ
Q1: Can I use PhotoMaker V2 with SD 1.5 or 2.0 models? A1: No, PhotoMaker V2 requires SDXL models for compatibility.
Q2: Where can I download the PhotoMaker V2 model? A2: You can download it from the Shimizu GitHub repository or directly from Hugging Face.
Q3: What resolution should I set for the latent image in ComfyUI? A3: Set the resolution to something that is compatible with SDXL, such as 768x1344.
Q4: What if my image does not have a square aspect ratio? A4: You can use the 'Prepare Image for Clip Vision' or a 'Crop Image' node to adjust the image’s focus.
Q5: How do I add style to my PhotoMaker-generated images? A5: You can use the 'Apply PhotoMaker Style' node or manually add text prompts to define the style.